PRODUCT SUPPORT
How to Setup Firsthand Software
Get Into VR – Request a Demo
Software Licenses
Firsthand software requires a license for each VR computer. Here is how to get your license and set it up:
- Create a new account or Login to register with Firsthand.
- Firsthand will send existing customers your license or contact you if you are a new customer.
Set up your license
For each computer you will receive one license for all your Firsthand software. Put a copy of your license into the top level of EACH Firsthand VR Application folder.
Here is an example for COOL!:
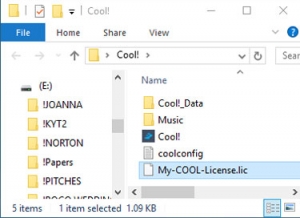
* IMPORTANT: THERE MUST BE ONLY ONE LICENSE FILE IN THE APPLICATION FOLDER. If you have more than one license, the application will start but it will not run properly. If you ever need to update your license, remove the old license from the folder.
Hardware & System Requirements
Full use and enjoyment of Firsthand VR applications requires an appropriate VR-ready computer and a compatible VR display. An under-powered computer or low quality VR display can significantly degrade the experience.
Supported VR Headsets
- Windows Mixed Reality
- HTC Vive
- Oculus Rift
Minimum Hardware Requirements
- VR-ready laptop or desktop PC
- Windows 10 Home or Pro
- Core i7 recommended; minimum Core i5 (SkyLake)
- NVIDIA GeForce GTX 1060
- 16 GB RAM (8×2 dual channel)
Supported Operating Systems
- Windows 10 Home or Professional (Vive and Oculus)
- Windows 10 Creator Edition required for Windows Mixed Reality headsets
Required VR System Software and Drivers
Firsthand software requires the following are installed properly:
1. Plug in your headset
2. Install Steam
3. Install SteamVR
Find support for your specific VR headset
VIVE SteamVR support
Windows Mixed Reality SteamVR Support
Oculus Rift SteamVR support
4. For Windows Mixed Reality Only: Install the WMR Portal.
5. Install the Leap Motion Orion Driver (required for GLOW)
6. Update graphics drivers: Nvidia GeForce Drivers
Run the VR Experiences
CLICK on the application icon to start the VR experience. Depending on the speed of your VR-Ready computer, it may take a little time to launch the VR application.
Make sure all VR hardware is connected properly and all software & graphics drivers are up to date. See the Hardware Connection and Troubleshooting section for more information.
VR Hardware Connection and Troubleshooting
Setup and troubleshooting your computer, VR display and peripherals
1. VR-Ready Computer
Be sure your computer is VR-Ready with enough CPU and graphics power to support your VR Headset. Find out the technical requirements for your VR headset:
2. VR-Headset
Follow the manufacturer’s instructions to setup your VR Headset.


3. Leap Motion
(Required for GLOW!)
![]() Your GlowPack comes with the Leap Motion Controller to get your hands into the action in GLOW! There are lots of other great applications out there for the Leap. Go explore at http://www.leapmotion.com.
Your GlowPack comes with the Leap Motion Controller to get your hands into the action in GLOW! There are lots of other great applications out there for the Leap. Go explore at http://www.leapmotion.com.
Download Leap Software Drivers (Orion): https://developer.leapmotion.com/orion
Connect and Install Leap Motion drivers at www.leapmotion.com/setup
LEAP VR KIT:
The Leap Motion mounts on the front of the VR headset with a VR mounting bracket available from the Leap Motion web site. Follow the instructions that come with the Leap VR Kit Support at https://support.leapmotion.com
Once the LEAP Motion controller is setup correctly on the computer, your hands will appear in GLOW! without any additional setup.

4. Scosche Rhythm+ Heart Rate Sensor
(Required for GLOW!)
The Scosche Rhythm+ links your heart rate to the biofeedback in GLOW! Your GlowPack comes with the Scosche Rhythm+ Fitness Tracker – which (when you’re not using it to run GLOW!) opens up a new level for your wellness and fitness. Go to http://www.scosche.com to find out more.
The Scosche Rhythm+ links your heart rate to the biofeedback in GLOW!
- Make sure the sensor is fully charged before using.
- Be sure the ANT+ hardware and software are fully functioning.
- Follow the instructions to turn on and operate the Rhythm+
- A BLUE LIGHT on the Rhythm+ indicates it has linked with the ANT+ and you are good to go.
- For optimal reception make sure to be as close to the ANT+ Stick as possible. Remove objects between you and your ANT+ Stick – having a direct line of sight between your sensor and the ANT+ Stick will work best.
Firsthand currently supports the Scosche Rhythm+™ Sensor. Other sensors and wearables will be coming soon.

5. ANT+ Stick
(Required to connect the Scosche Rhythm+ Sensor with GLOW!)
The ANT+ USB Stick included in your GlowPack The Scosche Rhythm+ heart rate sensor communicates with the computer using the Ant+ communication protocol.
ANT+ Setup and Troubleshooting:
- Connect the ANT+ USB stick to any USB port on your computer.
- Install Device Drivers – if required. Check with the manufacturer if your ANT+ Stick to obtain required drivers.
- If the drivers are installed properly but you encounter problems running GLOW!, check for conflicts with other software.
See https: //www.thisisant.com/ for more information on the technology behind ANT+.

Minimum VR System Requirements for Firsthand Software
Supported Equipment
Full use and enjoyment of Firsthand VR applications depends upon your use of an appropriate VR-ready computer and a compatible VR display. An underpowered computer or low quality VR display can significantly degrade your VR experience. Our software is tested and supported only on the following hardware and software platforms:
Minimum System Requirements
VR-Ready Laptop or Desktop PC
– Recommended CPU – Intel Core i7 Skylake or newer (Intel Core i5 2016 or newer may also support VR)
– Supported Graphics Cards: Nvidia GeForce GTX 970*, 980*, 980Ti, 1060, 1070, 1080, 1080Ti
– RAM: 8GB minimum, 16 GB recommended
– Windows 10 Home or Pro
*Mobile versions of 9xx GPUs (970M, 980M) are not supported.
Other Components
– Supported VR headset: HTC Vive® or Oculus Rift®
– Supported Controllers: Vive controllers, XBox Controller (Oculus), Oculus Touch, mouse, Leap Motion (for GLOW!)
– Supported Biosensors: Scosche Rhythm+ and Ant+ (for GLOW!)
Product Warranty - Refund Policy
PRODUCT WARRANTY
Firsthand warrants for a period of ninety (90) days from the installation date of the Initial Version (the “Warranty
Period”) that the Software, unless modified by Licensee, and the accompanying media, will perform the
functions described in the Documentation in all material respects when installed on the Computer(s) and
operated on the platform specified by Firsthand. This warranty shall not apply with respect to (i) altered,
damaged or modified Software; (ii) Software that is not the then-current version; (iii) Software problems
caused by Licensee’s negligence, hardware malfunction or other causes beyond the control of Firsthand; or (iv)
Software installed in an operating environment or in a hardware environment for which the Software has not
been licensed. Firsthand does not warrant that the Software will meet Licensee’s requirements, that the
Software will operate in the combinations which Licensee may select for use, that the operation of the
Software will be uninterrupted or error-free, or that all Software errors will be corrected.
REFUND POLICY
All purchases of Firsthand Applications are final and non-refundable. No returns will be accepted. Products
downloaded to or shipped out of The United States of America are sold as-is and shall be covered by no
warranty.
Firsthand Applications must be used on supported hardware systems as described in this Agreement. Failure to
use the Applications on unsupported hardware will not be accepted as grounds for any refund.
Your total price will include the price of the product plus any applicable sales tax; such sales tax is based on
the bill-to address and the sales tax rate in effect at the time of purchase.
Prices for products offered at this web site may change at any time. No guarantee is provided of price
protection or refunds in the event of a price reduction or promotional offering.
If a product becomes unavailable following a transaction but prior to download, your sole remedy is a
refund. If technical problems prevent or unreasonably delay delivery of your product, your exclusive and
sole remedy is either replacement or refund of the price paid, as determined by Firsthand.
Any claim submitted under this warranty must be submitted in writing to Firsthand within the Warranty Period.
Firsthand’s sole and exclusive obligation for warranty claims shall be, at its option, to (i) replace the defective
Software or media with Software or media that conforms to the above warranty, (ii) provide a workaround,
or (iii) return the applicable license fees paid to Firsthand prorated over a twelve-month period from the Effective
Date for the number of quarters or fractions thereof during which the Software was used by Licensee.
GLOW Hardware Setup: Leap, Scosche, Ant+
GLOW! Required Hardware
- VR-Ready computer
- Supported VR headset (HTC Vive, Oculus)
- Leap Motion Controller
- Scosche Rhythm+
- ANT+ USB Stick
See the Hardware Support Section above for detailed instructions.
COOL! Vive Controllers
Playing COOL!
Launch COOL! by double clicking the icon on your computer.
When COOL! first starts you be transported to the Star Field. In the center of the Star Field you will see the COOL! logo directly in front of you. If the COOL! logo is not centered in front of you, we recommend you recalibrate your VR system according to the instructions from the VR display manufacturer.
The Star Field is a giant playground to help you set up your system and practice using the controls.
—————
PLAYING IN COOL! WITH THE GAME CONTROLS
The following describes playing COOL! with the HTC Vive hand controllers. We suggest all users read this section, and check the notes below for regarding other controllers and input systems.
HTC Vive Controllers: In COOL! you will use the TRIGGER (#7 in the illustration below) on each of the HTC Vive’s two game controllers. One controller will throw magic bubbles, the other throws rainbow trout, a.k.a. Fish.

HINT: People have a lot of fun throwing the fish and bubbles straight up above them and watching them fall. Try hitting the bubbles with the fish….or just groove on watching them fall into the abyss.
STARTING THE JOURNEY (GRIP BUTTON)
When you’re ready to start the COOL! Journey, press any of the GRIP buttons (#8) on both controllers. Note: Any of the individual level screen-buttons also start the journey.
COOL! is a playground of playful otters, dancing flames and caves of surprises. HINT: The more you throw the more fun you have.
—-
TURBO MODE
You’ll notice that if you pull the TRIGGER and hold it, a set of concentric rings appear. This is Turbo Mode – and gives you superpowers to launch your fish into the next dimension.
Changing Display Modes
CHANGING THE VR DISPLAY MODES
Choose from three VR display modes:
- HMD: (HTC Vive, Oculus CV-1)
- Over-Under Stereo (for specialized 3D displays)
- Screen (No VR helmet)
Use the Settings Interface in your application to set the VR Display Mode. You view and operate the Setting Interface from your computer monitor – it will not appear in the VR helmet display. Press the ENTER key to show and hide the Settings Interface.

Click on the Settings Icon in the top left corner. This will open the settings window. Choose a display mode and close the window.
Setting the Monitor Display
MONITOR DISPLAY
If you wish to adjust the window size, resolution and quality of the video output for COOL! press and hold the CONTROL key immedately after you click the icon the launch the application.
• Windowed checkbox: when the checkbox is checked the application runs in Windowed mode. Uncheck the box to run the application in full-screen.
• Quality: Increase system performance by reducing the quality level.
• Resolution: Adjust the resolution to match your computer monitor. This should not be below 1280×720. On touch-screens, set the size to the minimum resolution (1280×720) in order to have the largest screen button size.
Custom Music (Cool Only)
USE YOUR OWN MUSIC FILES
COOL! allows you to use music files from your personal library. Select the CUSTOM MUSIC checkbox (located under the Music Volume Control). Put your music files in the /Music folder. The music file must be in WAV format. This feature is unsupported, so we hope you have fun with it, but we won’t respond to inquires on this topic.
Optional Hardware Components
Firsthand software has also been tested and works with NVidia GeForce GTX 970(desktop), 980(desktop), 980Ti, 1060, 1070, & 1080 GPUs. Other graphics cards may work, but are unsupported.
On Oculus Rift Cool! can be used with the XBox Controller, but the experience is much enhanced by use of Oculus Touch Controllers. A Scosche Rhythm+ heart rate monitor and Ant+ USB receiver are required for biosensor capability and are included in the GlowPack. A Leap Motion Controller with the Universal VR Developer Mount is required to run Glow! and is also included in the GlowPack.